VS Code Configuration
VS Code plugin picks, keyboard shortcuts, custom cursor keys and @types for code completion.
On this page
I won't waste words here on what VS Code is or how to install it. Just get in and start using it!

Reading through a pile of VS Code recommendations is less useful than importing someone else's setup and trying it out for yourself. Below is my complete set of VS Code configuration files. Download and import them if you like (just replace the matching files in your local VS Code).
Download link https://pan.kuizuo.cn/s/RgiP password kuizuo
#Preface
vscode is the text editor I use the most, and the best one I've ever used. I've been working with VS Code for the past year, and I have to say, Microsoft really delivers!
Here I'll recommend some VS Code settings and common operations that have genuinely improved my coding efficiency (the everyday ones I won't bother with).
#Plugin Recommendations
#GitHub Copilot
AI writes code. Everyone who has used it says it's great.
Official site: GitHub Copilot · Your AI pair programmer
#Bracket Pair Colorizer 2
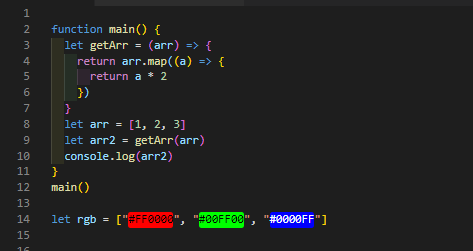
If you don't want your code to be a sea of white, or you just want the brackets to look nicer, this plugin is highly recommended. Also, when you've written a lot of code and need to delete nested brackets, colors make them much easier to find.
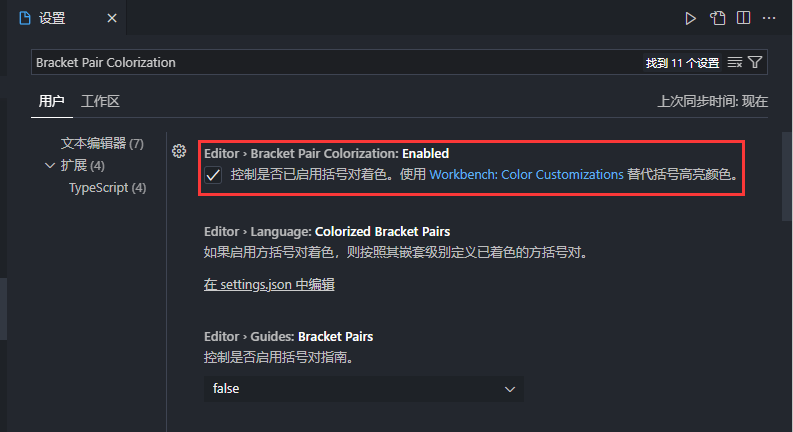
VS Code now has this built in, so you don't need to install anything. Search for Bracket Pair Colorization in the settings and tick the box.
#indent-rainbow
As the name says, it gives indentation a rainbow: each indent level gets a different color (you can see the slight color differences in the code above). It's especially useful when indentation gets deep. Combined with the VS Code shortcut `Ctrl + Shift + `, you can quickly jump to the position of the next bracket.
#Prettier
First, know that VS Code's format shortcut is Shift + Alt + F. However, VS Code's built-in formatter doesn't handle some file types, such as vue. In that case, install this plugin to format Vue code.
I didn't learn about this great formatting plugin until I had been using VS Code for half a year. Before that I used Beautify, but I was never happy with its results, and some files still wouldn't format at all. If you're still on Beautify, switch to Prettier, you won't regret it.
If you're a Vue 2 user, Vetur is a must-install. It not only formats code but also provides suggestions. If you move to Vue 3, Volar is the plugin to pick.
#ESLint
Essential for front-end engineering code standards. Nothing more to say.
#Turbo Console Log
I have to recommend this one. Sometimes testing JS doesn't need full debugging. You just want to print a result, and then you keep typing console.log() over and over. This plugin does it in one keystroke. It can also comment out, enable, or delete all console.log statements at once. It's one of the plugins I use most.
Shortcuts used:
- ctrl + alt + l: after selecting a variable, press this to generate a console.log
- alt + shift + c: comment out all console.log
- alt + shift + u: enable all console.log
- alt + shift + d: delete all console.log
The output includes the current file, line number, scope and variable (with a little rocket 🚀 in front), like this (printing variable a):
console.log('🚀 ~ file: demo.ts ~ line 111 test ~ a', a)
The one drawback is that this plugin doesn't support custom shortcuts.
#Live Server
After installing this plugin, a Go Live button appears in the bottom right. Click it, and if your root directory contains an index.html file, it opens your browser with a local server (port 5500 by default) and shows the HTML you wrote. If there's no index.html, it shows a directory listing instead. You can also right-click a file and choose Open with Live Server.
Note that you need to open a folder in VS Code, not a single file, or the Go Live button won't appear. This plugin is very handy for opening static pages that only work properly when served by a web server.
#Live Share
Careful, despite the similar name this is completely different from the one above. It's for real-time collaboration. Just sign in with a GitHub or Microsoft account and you can share your local code live with others. You can also see where the other person's cursor is and send messages. For remote collaboration it's a real lifesaver.
#REST Client
It lets you send HTTP requests from VS Code and view the responses there. I use it a lot for protocol analysis. How good is it?
You can copy the HTTP request portion from a packet capture, paste it into a temporary file in VS Code, and when you need it, save it as a .http file and keep it for good. Right-click and choose Generate Code Snippet, or press Ctrl + Alt + C, to generate examples of sending the same HTTP request in different programming languages. The experience is honestly on par with some dedicated HTTP tools (I mean you, Postman).
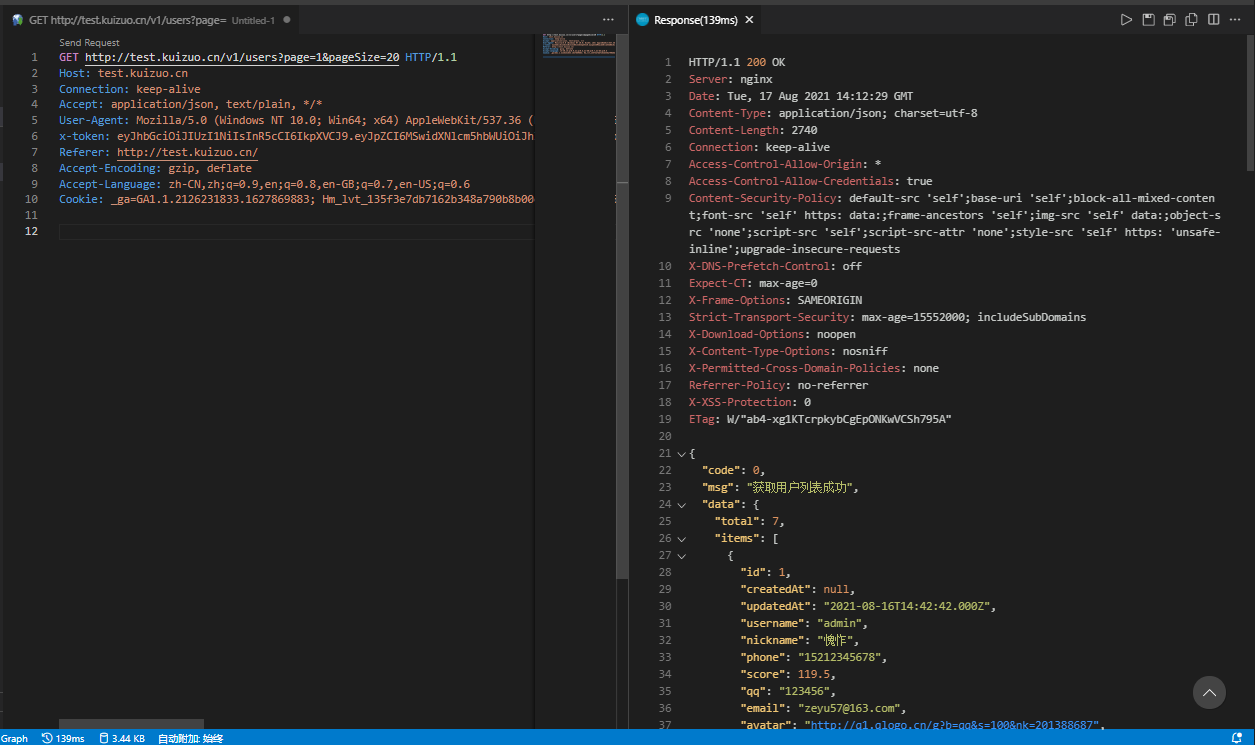
caution Click the gray Send Request at the top left. Users who have Code Runner installed can easily hit the play button in the top right by mistake.
#Thunder Client
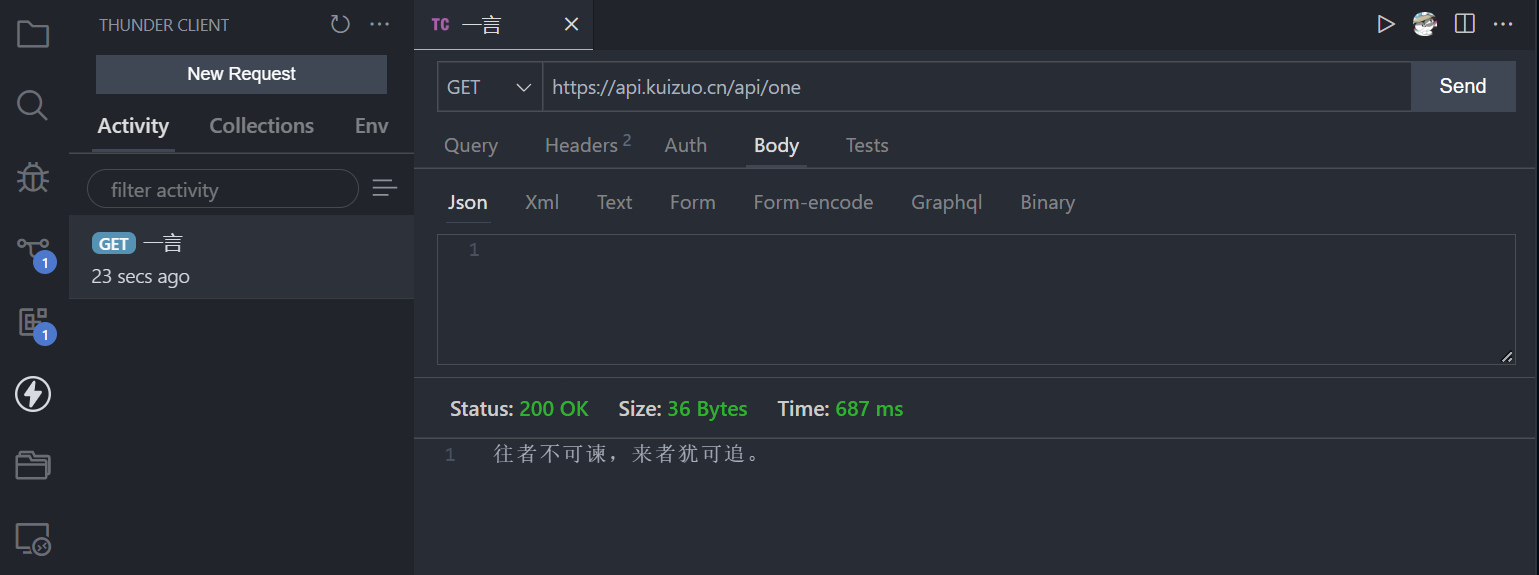
If you want Postman or ApiPost-style API debugging inside VS Code, try this plugin. It supports collections and environment variables. If you're only testing for yourself and don't need to share APIs, it covers most daily API debugging needs.
#CSS Peek
Quickly view where a CSS class is defined. It's easy: hold Ctrl, point at the class name of the style you want to check, then left-click to jump straight to it. Holding Ctrl works for other kinds of definitions too, such as functions and variables, and so on...
#Project Manager
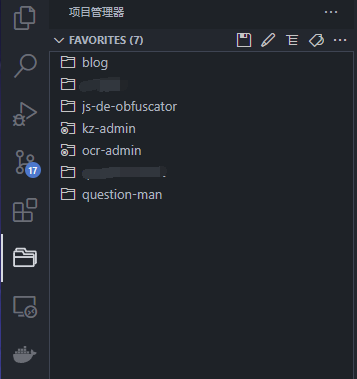
For projects you use often, you can add them to VS Code with this plugin and open them straight from the project manager in the left sidebar.
There are plenty of plugins I haven't covered. My personal advice is to just download my config file and import it. It includes plugins, themes, keyboard shortcuts, layout and more.
#Keyboard Shortcuts
#Common Shortcuts
I won't explain Ctrl + C, Ctrl + V and the like. I'll focus on a few you might not know about, which people often still do with the mouse.
Shift+Alt+F format code
Shift+Alt+R reveal in Explorer (handy, since right-clicking a file to find it gets tiring)
Shift+Alt+A block comment
Shift+Alt+Down Arrow copy the current line to the line below
Ctrl+D select the next matching occurrence too
Ctrl+F2 select all occurrences of the current selection
Ctrl+Shift+L get all matches of the current selection for quick editing and deletion (the upgraded version of the previous one)
Ctrl+Alt+Down Arrow add a cursor in bulk (same idea going down, and up works too)
Ctrl+~ open the terminal
Ctrl+Shift+[ fold code
Ctrl+Shift+] unfold code
Ctrl+K Ctrl+0 fold all
Ctrl+K Ctrl+J unfold all
Ctrl+Backspace delete the previous word (especially useful)
Ctrl+Alt+Right Arrow quickly move the current file into a separate tab group on the right (no need to click the split button)
Ctrl+Shift+Right Arrow select text one word at a time, which is handy
If you can, use Ctrl + Shift + K to delete a line instead of cutting it with Ctrl + X
Whenever a shortcut exists, use it instead of the mouse:
- Ctrl+E/P jump to recent files (press again to go to the next file, add Shift to go to the previous one)
- Ctrl+Tab switch tabs (like Alt+Tab on Windows). Switching between tabs that are already open is more comfortable with this than with the one above
- Ctrl+G jump to a line (stop scrolling with the mouse)
- Ctrl+Shift+O jump to (list) a function in the current file
- Ctrl+T search for a function across the whole project (in Markdown, it searches headings)
- Ctrl+N create a temporary file (stop double-clicking the tab bar)
- Ctrl+W close the current tab (this is the browser habit; don't add Shift, and stop clicking the close button)
- Ctrl+Shift+T reopen the tab you just closed (a lifesaver for clumsy fingers; works in browsers)
- Ctrl+B toggle the left sidebar
Those are basically the shortcuts I use every day. They really have boosted my coding efficiency. I strongly suggest you open VS Code right now and try these without touching the mouse. You'll be surprised how it feels!
#Custom Shortcuts
VS Code also lets developers define their own shortcuts. The main use is cursor movement. When coding you often need to move the cursor to a specific spot, and then your right hand has to leave the keyboard to reach for the mouse or the arrow keys, over and over. Is there a way to move the cursor without moving your hand? Of course there is, and there are basically two options.
- A custom keyboard, or a keyboard with programmable macro keys. One example is the HHKB, which has been hailed as a "dream tool for programmers." Feel free to search for it.
- Custom shortcuts
In fact, you often don't need to set your own shortcuts at all. They only exist to satisfy some people's needs. For example, I've set up just six of them:
- Shift+Alt+J move cursor left
- Shift+Alt+K move cursor down
- Shift+Alt+L move cursor right
- Shift+Alt+I move cursor up
- Shift+Alt+; move cursor to the end of the line, the same as the End key
- Shift+Alt+H move cursor to the start of the line, the same as the Home key
- Shift+Alt+U select a code fragment, which can then be joined into a single line
Setting them up is simple. Open Settings, find Keyboard Shortcuts, then search for the cursor-movement commands. Or open the keybindings.json file and add the code below.
[
  {
    "key": "shift+alt+j",
    "command": "cursorLeft",
    "when": "textInputFocus"
  },
  {
    "key": "shift+alt+l",
    "command": "cursorRight",
    "when": "textInputFocus"
  },
  {
    "key": "shift+alt+i",
    "command": "cursorUp",
    "when": "textInputFocus"
  },
  {
    "key": "shift+alt+k",
    "command": "cursorDown",
    "when": "textInputFocus"
  },
  {
    "key": "shift+alt+h",
    "command": "cursorHome",
    "when": "textInputFocus"
  },
  {
    "key": "shift+alt+oem_1",
    "command": "cursorEnd",
    "when": "textInputFocus"
  },
  {
    "key": "shift+alt+u",
    "command": "editor.action.joinLines"
  }
]
Custom shortcuts are a matter of personal taste and don't suit everyone. Keyboards are convenient, but nothing beats a mouse for directness. I'm just mentioning the shortcut setups I use in VS Code.
I also set up one more. When you double-click empty space to create a new file, it defaults to plain text, and to get it into JS or another format you have to click the small button in the bottom right every time. That's very annoying, so I gave myself a shortcut for it.
First, find the Configure Language Specific settings command in Keyboard Shortcuts.
I set it to Ctrl + i Ctrl + k. Your choice may differ.
#Code Completion
You've probably run into this in VS Code: you import a local module, but sometimes there's no code completion for it. Like this:
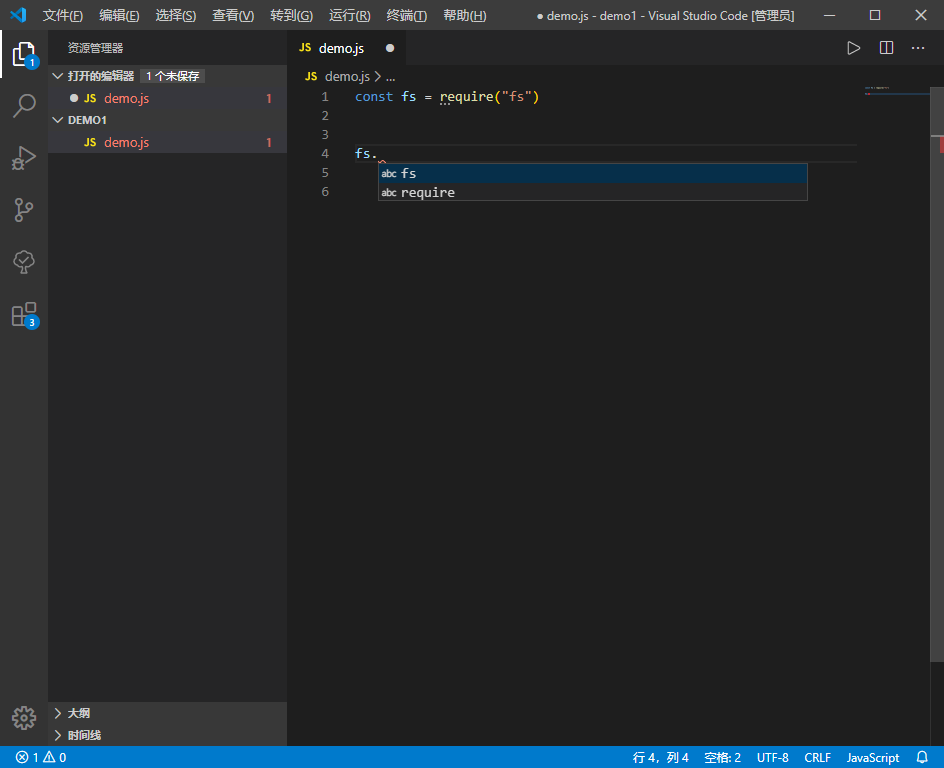
Take importing the local module fs, for example, with no code completion. The quickest fix for local module completion is this one line:
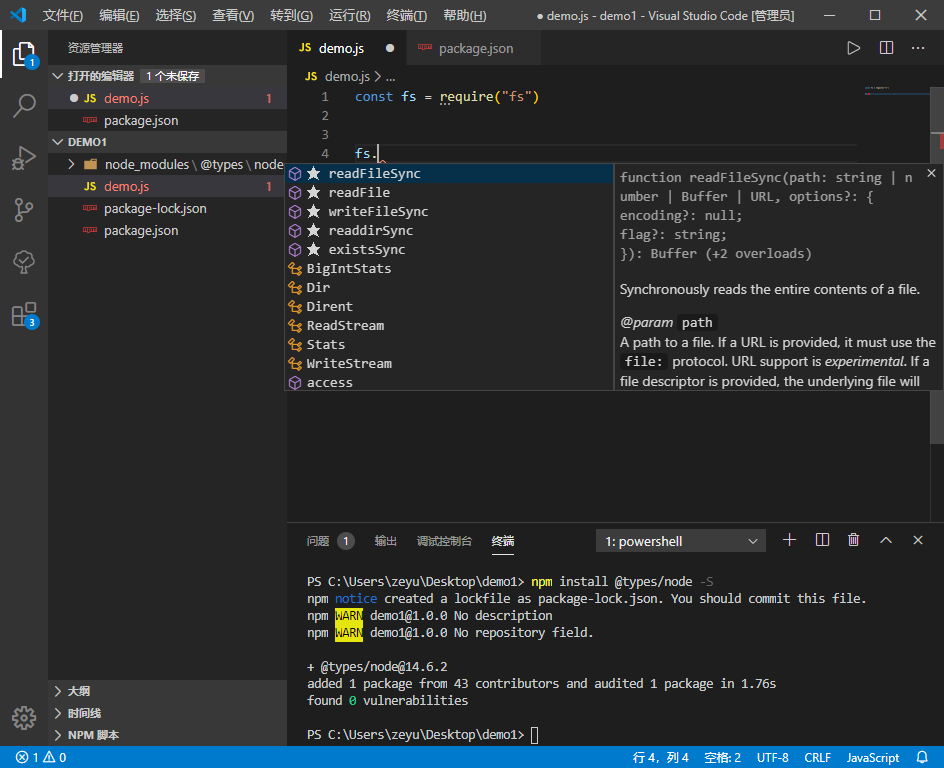
npm install @types/nodeBut if you do that in a directory without a package.json file, the install will certainly fail. You need to initialize the project structure first, by running:
npm init
or
npm init -y
Then you'll see a node_modules folder in the directory. Inside it there's an @types folder, which is where your code completion files live from now on. Right now @types contains a node folder, which is the result of the npm install @types/node command we just ran. Now try it: the code completion really does appear, and it even has a star-recommendation marker.
Now, my code uses jQuery. I already have a local jquery.js file and don't want to install the jQuery module, but I still want jQuery code completion. In that case, enter the command below and you'll get the completion.
npm install @types/jquery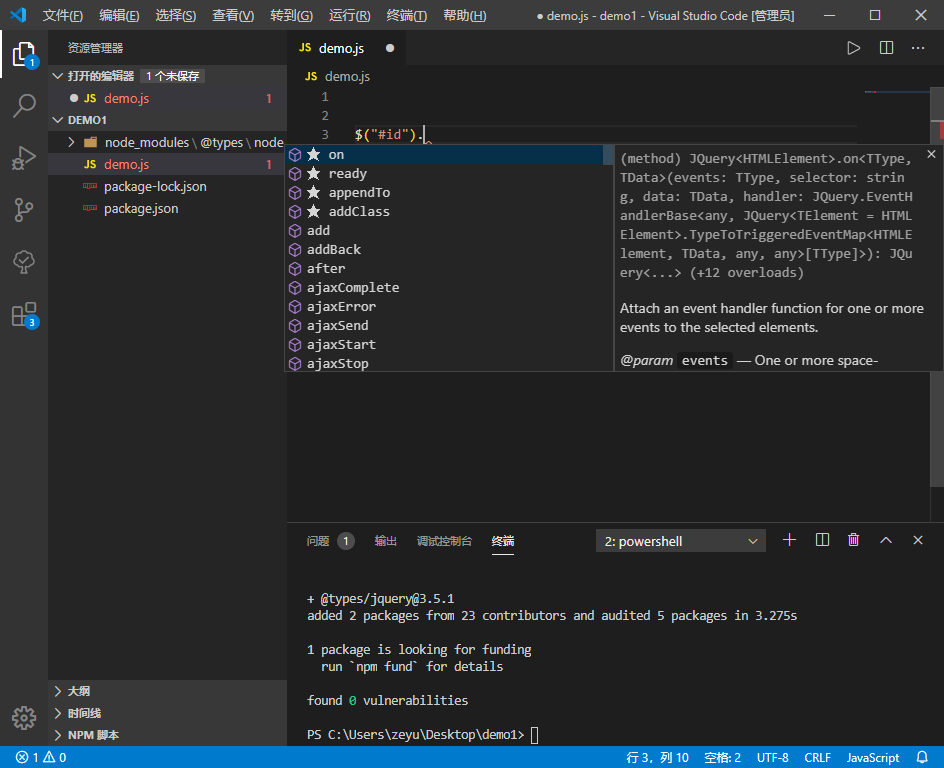
Some libraries don't come with code completion when installed. For example, express. Using the same method above works here too.
I won't go through the express installation steps. Just look at the picture first.
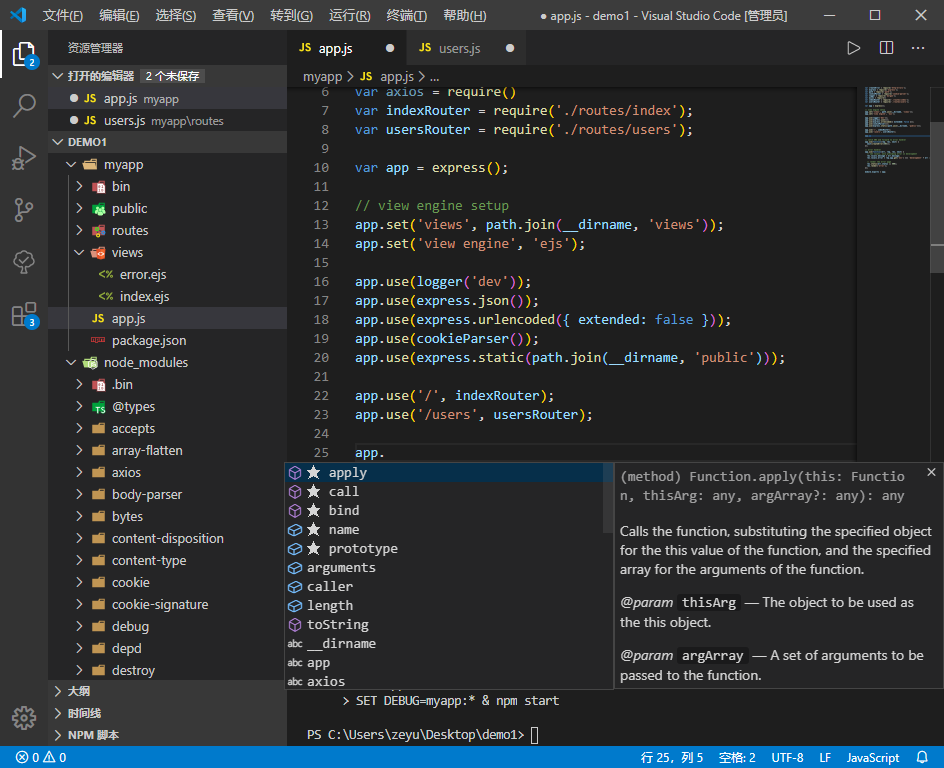
Why does the app's completion only show the built-in JS suggestions?
Then, looking inside node_modules\@types, why are there only the ones I just installed?
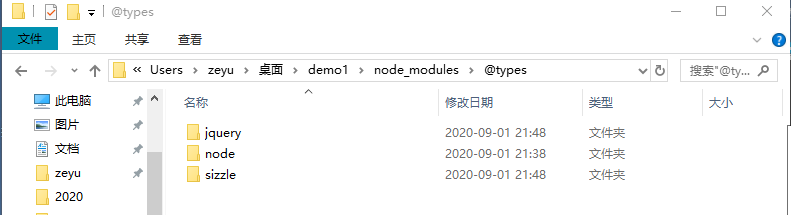
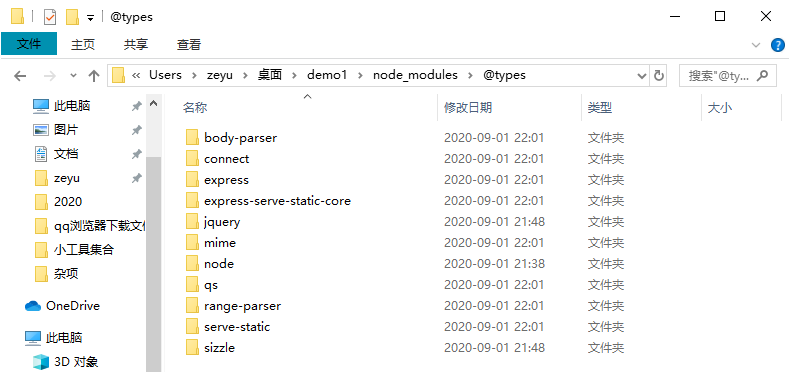
Let's try this:
npm install @types/expressNow node_modules\@types has a few more folders, one of them named express. Completion for express should definitely work now.
Sure enough, VS Code now shows normal code completion.
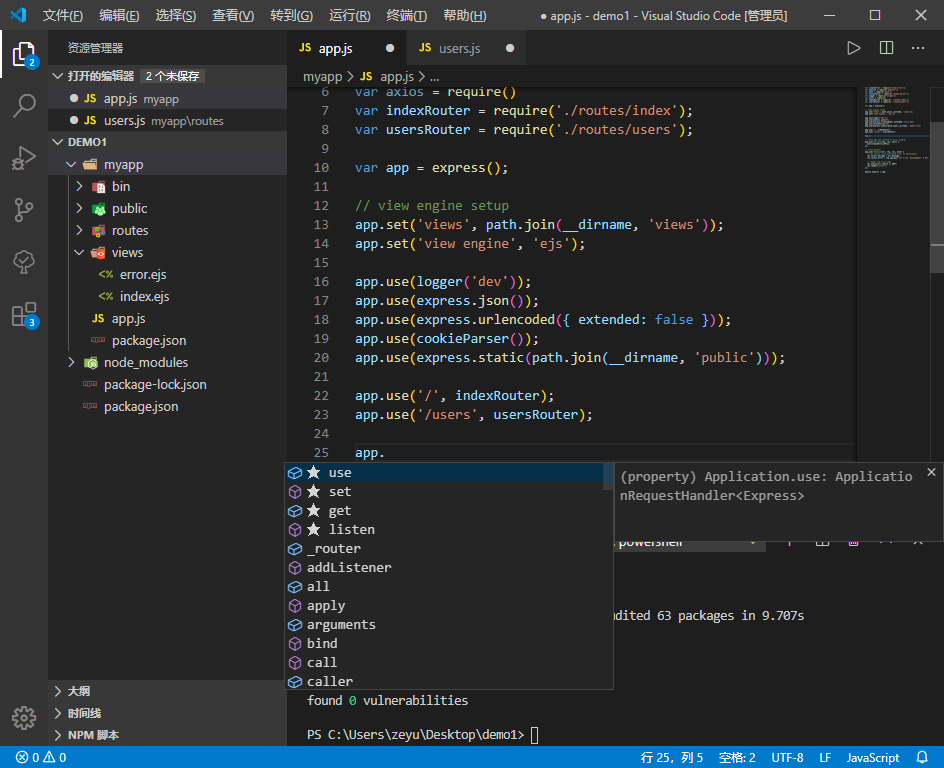
info Note that if the library you import is written in TypeScript, you don't need to reference @types/xxx. Some ancient libraries are written in JavaScript, so they naturally have no completion, and you need to borrow the official @types/xxx packages from TypeScript.
From the examples above, the @types folder holds the code completion files for the current VS Code workspace. To get completion for a module, just run npm i @types/module-name. If your current workspace has no completion, that's most likely the problem.
#Custom Completion and Snippets
Here's one more thing. Sometimes I want to define my own completion. Is there a way? Of course. If you've ever learned Java, you've probably suffered typing System.out.println every single time. In that case, you can do the following:
- Create a
.vscodefolder, and inside it create a file namedkuizuo.code-snippets(any name works, as long as the extension is code-snippets) - Write the following code in that file
{
  "System.out.println": {
    "scope": "java",
    "prefix": "syso",
    "body": ["System.out.println($1);"],
    "description": "Print to the console, followed by a line break"
  }
}- System.out.println is the name of the snippet. It doesn't have to be exact.
- prefix: the text that triggers the snippet
- body: the content that fills in when you press TAB. It's an array, and each line must be wrapped in double quotes. Template strings can't be used.
- description: the text shown in the completion list
- scope: the language it applies to. You can list several, such as "javascript,c"
- $ followed by a number: cursor stops. If there are several, Tab jumps to the next cursor position
What this code means is: type the prefix syso, press Tab, and the body System.out.println($1); appears as a completion. $1 is where the cursor lands, as shown here:
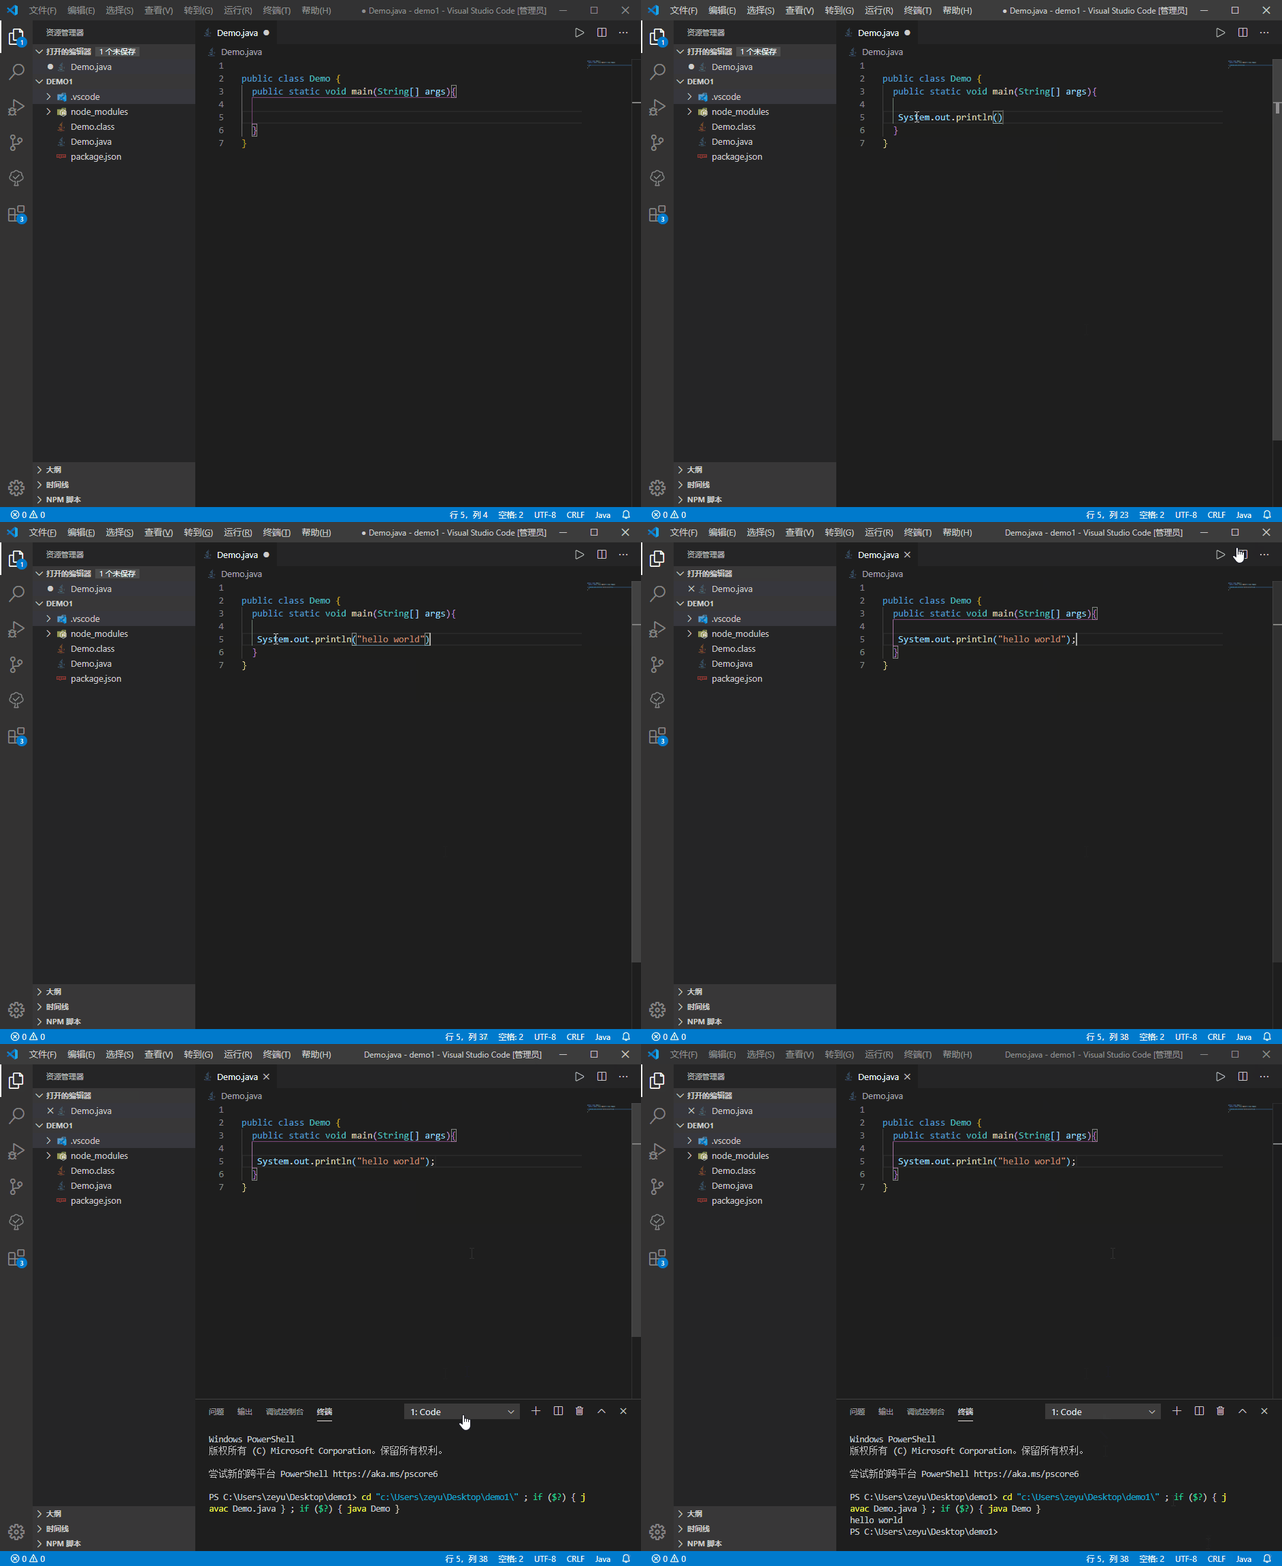
That said, snippets like this are rarely needed. Plenty of ready-made plugins cover the completion you need. But sometimes they're much more convenient.
Plugins often ship with their own completion suggestions, and you can "borrow" those too. Here I'll use autoJS_pro as an example (if you've never heard of it, feel free to skip this part).
- First install the autoJS_pro plugin, then go into C:\Users\Administrato\.vscode\extensions\hyb1996.auto-js-pro-ext.... (Administrator is the username)
- Find the file whose name ends in snippets, open it, and copy all of its contents.
- Open VS Code and do as above: create a .vscode folder, and so on.
- Paste the copied snippet code into the snippets file we created, uninstall the auto.js-pro plugin, and restart.